Modpacks require extra files to function. Some of these files are generated when you start the modpack server for the first time. To simplify this process within this tutorial, we will let you generate the files on your local PC instead by having you start the server there for the first time. Once this has been done, we will go through uploading your files your Anvilnode Minecraft server. If you're stuck anywhere in the process, feel free to contact us.
1. Stop your Anvilnode server and remove or download any old files you may have on it. We also suggest deleting the world so that your modpack can generate a fresh one with the included blocks.
2. Download the modpack files of the modpack you would like to install onto your computer, and get them ready:
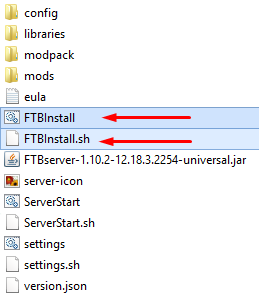
Here is a screenshot of the Files in modpack we’re using in this tutorial:

1: These .bat and .sh files are used to launch the server when running it on your own computer, and not with Anvilnode or another host. These files need to be deleted. There is an exception for some modpacks if you see a file called FTBInstall.sh and FTBInstall.bat. You will need these files later on in the guide, see below.
2: This is the main server jar. It will be named something similar to this, or forge, or with the modpack name.
3: Usually there will be a JAR file called minecraft_server.XXXX.jar or similar, you need to leave this file alone as it is required to run most modpacks.
Modpacks that contain FTBInstall.sh and FTBInstall.bat files:
If you see the FTBInstall.sh or FTBInstall.bat files you will need to run one of them. .bat is for Windows computers, and .sh is for Mac and Linux computers.
It is important that you have run either one of these files before you upload the modpack to your server later on, this file will download additional dependencies so that your modpack is able to run.
After running either one of the FTBInstall files, another file will appear.
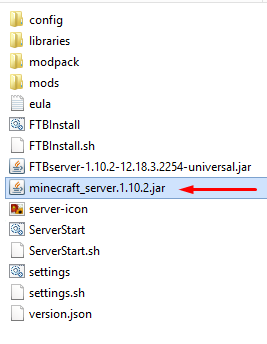
Now you will need to rename the main server .jar (FTBserver-1.10.2-12.18.3.2254-universal.jar in this case) to custom.jar and delete the .bat and .sh files as we don’t need them anymore. Once you have done that, you will have something like this in the end:
3. Upload your custom modpack files to your server using an FTP client or our built in FTP File Access found in your Anvilnode Multicraft panel (Files > FTP File Access). You can find a tutorial on how to setup and use an FTP client to manage your server files here.
4. In the Anvilnode Multicraft panel using the JAR Drop Down Selection Menu select Custom and click the Save button at the bottom of the page. This will tell your server to load the my.jar server file you had renamed in the previous steps mentioned above.

5. You may now start your server.
If you get stuck during this process or have any questions about this process please open a support ticket, we would be more than happy to assist you.
Click this to open a Support Ticket with Anvilnode